


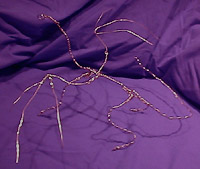
 Summer, 2001: I knew I wanted to sculpt this summer cuz I haven't done so in such a long time. The clay content in my blood was dangerously low. I wasn't quite sure what I wanted to do, but I knew it should be a dragon. Once upon a room-cleaning morning, I came across the picture on the left. This is the inspiration behind my sculpture. I drew this perhaps three years ago at work. The legs in the front are positioned wrong (I was younger, then), but I liked the way it looked. Self, this is your dragon, I said. It should look like a cat, lean and fit. It should look as if it paused while walking, as if it heard an odd noise or saw something interesting. It should also have wings --- which I sure as hell wasn't going to make completely out of clay. Happily, I've had two scarves bought expressedly for the purpose of becoming dragon wings. The horns and claws should be golden, and I have some fine gold paint that should do the trick. If it doesn't, I shall resort on my favorite solution: nail polish. Don't laugh; I'm sure I could surprise you with how useful nail polish is.
 |
 |
I needed a few references for this sculpture. I would have prefered to have pictures showing the muscles of a cat, a human, a horse and a bird, but these were what I had on hand. I wanted my dragon to look cat-like, so I based the skeleton on a cat's. I tried making the wings look like a bird's (with staggered fingers instead of a hand), but that looked stupid. I used the proportions of a bird wing and the shape of a bat wing. This sculpture could never fly, but that doesn't mean I can't make it look like it could have.
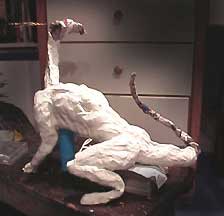
 I created a wire armature with 14 and 16 gauge copper and brass wire. (Hey, I work with what I've got.) I needed the 14 gauge cuz this is a large sculpture, the largest I've ever done, and I'm going to need that support while I'm slapping clay on the sucker. The wire armature isn't intended to act like our bones and support the full weight of the sculpture when it's done. The baked clay will be strong enough to support itself. The armature supports the sculpture as I'm making it so the clay doesn't droop. Since I sculpt things with wings and horns and long necks, that support comes in handy!
Oh, you can't really see the armature right now cuz there's all this newspaper in the way. What gives? Clay is far more expensive than newspaper; and the more volume I can take up with newspaper, the less money this damned thing costs. It also makes it lighter and much easier to handle. Yes, to sculpt the bottom I'm gonna have to bench press this bugger. Actually, I ended up ripping the paper off the legs cuz it was too thick. My dear artistic friend Jean suggests I use tin foil instead of newspaper. That'd work and the foil would be easier to sculpt than the paper. This wire-and-newspaper deal? I didn't think of it on my own; I learned it at summer art camp in a barn. Clever folks, there.
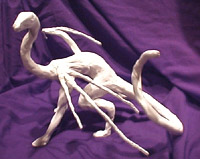
Once I like the posture of the armature (and, trust me, that's a challenge in itself), the clay process begins! What a pain in the tail. I start with the legs so the sculpture can support itself. If I started on the body, the wire legs wouldn't be able to keep it standing. In the beginning I just work on approximate volume. I know I want the leg wide at the top and thinner at the bottom with a little glob on the bottom for a paw. I know I want flight muscles near the front and bottom, so I add more clay there.
 |
 |
As I add clay, the armature complains and warps, so I periodically muscle it back to where it should be. It doesn't always work. I left the tail and the head for last cuz I didn't want them to be drooping, too. Besides, I had my creative hands full with the body. Please understand that there were very few nights when I did not want to throw the blasted thing against a wall and start over! The posture looked artificial, it was too long (don't ask about the 1-inch spine-removal operation I did), the tail was too long, the tail was too short, the arms were too small, the legs were too long --- constant problems! I didn't even mention the wings! What the heck could I do about the wings?
Let me explain my dilemma. (And realize that I'm still working this one out.) The clay I use is called Sculpey clay. It's white, smells like plastic, is mushy when fresh, doesn't need to be kept moist (and consequently won't give you athlete's foot on your hand), and can be baked in an every-day home oven at 375°F --- a great quality! However, said every-day home oven restricts the volume of my sculptures.
 I never had a problem with this cuz our oven is fairly large and my sculptures reasonably sized. This one proved to be my undoing. With the wings extended it will not fit in the oven! I could fix the problem by scrunching the wings up near the body, but I want one of them to be extended. Foolish bird. And why did I make the wings so large? Stupid Jillian wanted her dragon to look semi-realistic, which means the wingspan is (according to fantasy) twice the body length. Big dragon, bigger wingspan.
Right now I figure I can fit one of the wings, which will be scrunched up next to the body. The other wing I shall bake separatly and attach by means of a clever plug-and-hole shape and lots of superglue. When I attach the wing, I can fudge the seam between the wing joint and the body with some unbaked clay. Sculpey is great clay! There's this SuperSculpey stuff out there that can actually be painted with water-based paints when cooked. (Versus normal Sculpey, which doesn't like water-based paints and makes them run and streak and look terrible.) SuperSculpey is also the exact color of caucasian flesh. My dear artistic friend Jean made a hand out of it --- I swear the damed thing looks real! Creepy. I suggested she nail it to her wall to hold her keys. Something like that deserves attention.
 |
 |
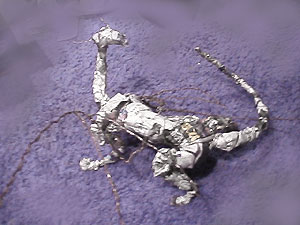
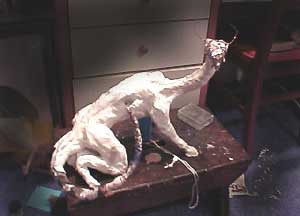
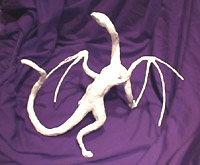
The sculpture looks pretty much like those rough pictures except I've done the tail and head. I also curled the tail around (read: to make it fit in the oven better), lowered the head, and arched the body. I slimmed it down a bit cuz it was just too buff and bulky. Its muscles are more defined, too. Here's a little secret: I'm pulling most of the muscles out of my a--- err, tail. I don't know where the muscles should go. I make it up as I go along. If a blot of clay looks like a nice muscle, a muscle it becomes. When I'm happy with those, I'll add a few tendons at the leg joints and the neck and shoulders. As I do this, I'm adding my 'trademark' extra-smooth-clay look, which is much easier to do when the clay is juicy and heated.
I've debated whether I should add faint scale texture to the back, upper legs, shoulders, and neck. I have decided against it. I have less than 20 days to complete this bugger; scales will only complicate things. (Besides, once I've gone and smoothed the whole body, the last thing I want to do is muck that up!) Pity. I pride myself in the detail I can add to my work, whether I'm using colored pencils, ink, or clay. I might add ventral plates, though. A proper dragon has belly plates, even if it doesn't have scales. Heh. I've been toying with the idea of dusting the baked sculpture with silver spray paint. Then again, the spare white does kind of accent the muscles. Hmm. Decisions, decisions.
Oh yes. Recall that crack about bench pressing this thing? I've used 8 lbs. of clay so far and will probably use another pound more. Guess who's laughing, now. Jeepers. Should have used more 14 gauge wire.
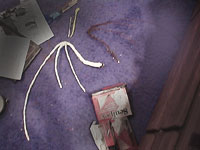
 The sculpture in the previous pics no longer exists as a whole. Lemme set the stage. I had just seen Runaway Bride with my parents and my Grandmother. Now, cute-overload aside, that's a decent movie. (Realize how difficult it is to get me to say I liked a movie.) Julia Roberts has a nice smile and Richard Gere has a pretty face and a cool cat. The soundtrack was pleasant, mixing background sounds (which made the movie) and songs. I have no experience with proper cinematography, but certain shots were put together well. I liked the psych gags. Anyway, I had just seen this happy, cute movie. I was tired from work, but I figured I'd get in some more sculpting time before I went to bed. Huh. After tusseling with the bugger for an hour, I realized this was not one of my better nights. In a fit of pure rage I understood that it was too large and unwieldy. (I should know, I wielded it briefly.) After this revelation came the realization that I would have to disassemble the work and recover the clay and wire. I daresay that I enjoyed myself immensely.
 After ripping the sucker to shreds (paper and clay bits everywhere --- such a scene of carnage and pointless violence!), I salvaged what clay and wire I could and set about building a new armature, a smaller, stronger armature! With cute wings. This time I will use tin foil cuz I noticed that the color dye from the paper seeped into my precious white clay. Grr. I used a double strand of 14 gauge wire, and damn! if that doesn't actually hold the whole sculpture's weight! This is one of the few pieces I've done that has not need additional support. I also wrapped the wings in 32 gauge wire to give it "teeth" for the clay to grip; otherwise, the clay would slide all over the place and be quite a pain.
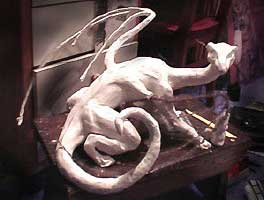
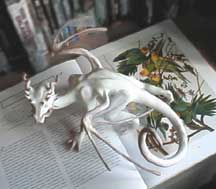
The new sculpture is less than a foot long from curled tail to turned head. (Of course, uncurled, the tail adds another foot to that.) It is lean and serpentine, just how I like my dragons! Well, maybe the wings aren't big enough, but they're much easier to manage. I've added two more references. The first is a fairie dragon from Thorarinn Gunnarsson's dragon books. A fairie dragon is long of limb and sleek, has golden scales, a long muzzel, soft jade eyes, and a crest of sapphire blue. The second is my grandmother's kitten-now-cat Missy (the third). As a kitten she jumped all over the place. Startle her and she would leap straight in the air at least a foot. She practiced jumping backwards a lot, too. She's grown into a slim and wirey cat that races around the house like a herd of elephants. Yes, a cat that isn't supernaturally quiet. Anyway, I just find myself thinking about this cat as I sculpt.
Hey, I'm baking this thing tonight! This is my last week of work, and I am eager to finish this sculpture before then. I'm pretty much satisfied with the general body. I've been working like crazy ('like a bird' for those who have birds and are thus in the know about their relative sanity) to get the finishing details, well, finished. I've decided to stylized the claws cuz I hate how, when I try to add realistic claws, they end up looking bulky and cartoonish. I've also decided not to add a tail fan, which is something I just can't resist adding. Check the temperature in hell, children, I'm doing something different! Same thing with those ventral plates I do so adore. (Truth be told, I like them so much because I can use them to show twisting and perspective.)
 I spend most of my time smoothing the bugger out to a shine and making sure no wires show through the 'skin.' If not that, then I'm working the beastly problem that is the head. I've got this real problem with repeating myself in art (read: Jillian has a problem with symmetry), especially in sculpture. I sculpt half the face, adding horns and muscles in a way that pleases me. I then sculpt the other half in a way that also pleases me. Invariably, the halves are unmatched. Each side is an optional way of doing the face. I simply must choose between them. (Those who know me would chime in saying just how difficult it is for me to make decisons! Don't ask how I picked my college. NO! I didn't flip a damned coin!) Heh, after choosing I've gotta actually make both halves look the same. Don't laugh, you try it. Sigh. S'looking pretty good so far. Once I bake it, I'll add gold paint to the whiskers and opalescent paint to the eyes. Then I'll cut and attach the wing fabric.
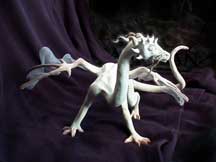
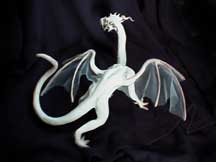
 Well. So, at a certain point I said, self, this damned thing (that was thrown against a wall at one point) is done! See the whiskers and the spiral horns? That was pure fun to add, my treat after finishing the body. Purr! The hardest part about the curly horns was in making them symmetrical, but you know my feelings about symmetry. The tricky bit about making whiskers (and any delicate detail) is in securing it to the dragon's cheek just at the point of contact. See, when you work with clay, be it Sculpey or ceramic, you must be sure that, when you add a piece of clay to another, they are 'grafted' together securely. You can't just push them together. Tricks of the trade.
Those pics are of the sculpture just before I chucked it in the oven. I'll getcha some pics of it baked and with the wing material attached. Damn, I always forget that the wings are one of the hardest parts of the sculpture to get right. By that time I had little patience and wanted to finish the piece. That impatience is why I decided against painting the whiskers, claws, and eyes. Had I thought about it, I would have added tendrils to the tail --- then I could paint the whiskers and tendrils gold, and the color wouldn't 'unbalance' the pure white statue. Feh. Anyway, as you'll see when I find some pictures, the baking gave the bugger a siamese look --- rather cool. Couldn't have done it better if I had planned it. Happy! Also, I made a Quicktime movie of it rotating.
 |
 |
 |